
Originally posted on Freel2.com in October 2018
As dark nights start to draw in and I tackle the morning commute in the dark, eye strain becomes a problem. I’m finding myself dipping the rearview mirror in the Freelander to avoid bright lights. Many following cars with headlights pointing up, left, right, anywhere but straight. Maybe I’m getting old. Maybe I’m just starting the journey earlier with tired eyes Maybe its the result of modern, brighter headlights. I need a fix.
That fix is the Freelander dimming rearview mirror retrofit. This is the first retrofit I’ve done of a Freelander factory option that wasn’t pre-wired. There are a number of threads on this topic, but none were sufficiently detailed to complete the job. I’m sharing my learning to help the next modder!
Dimming Mirror Sensors
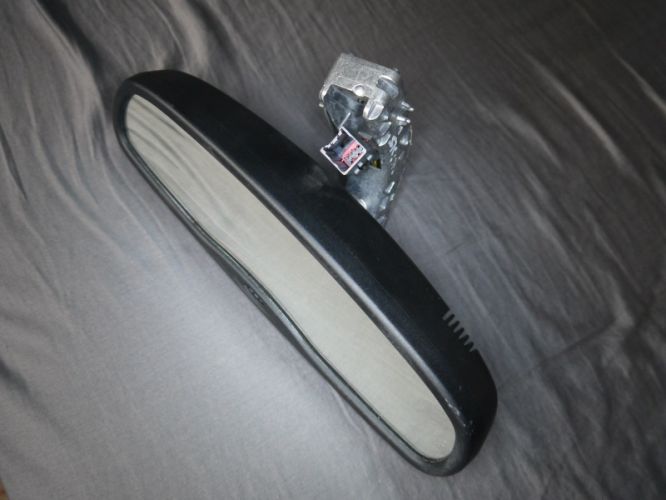
So this is the mirror, you can see the 8 way Tyco GET series connector between the mirror and bracket. The part number for this mirror is 6H52-17E678-BE, there are likely a number of variants going by the suffix.
The dimming is calculated based on the brightness reaching a forward and rearward light sensor. If the rearward light is significantly brighter than the front, the photochromatic layer in the glass darkens.
Along with the auto-dimming function, this mirror also has a humidity sensor/ ambient temperature and glass temperature sensor. These connect to the HVAC controller by LIN bus. The HVAC can use the sensor data to calculate the dew point of the air and calculate when the screen is likely to mist, and do something about it, hopefully.

Wiring Connections
The wiring is straight forward and consists of ignition fed supply and ground, then LIN communication for the HVAC and a trigger for reverse gear selection. There is a legal requirement that when you put the car in reverse any dimming should clear. Makes some sense if you don’t want to run into something!
I checked the roof harness code on my car (DH52-14335-AFC) which does not include the wiring for the mirror, so I’ll need to make a harness. And I have the wiring diagram from TOPIX with the wire lengths on so this shouldn’t be too hard.

If your looking for wiring diagrams, try this link;
https://www.freel2.com/forum/post357676.html#357676
Finding the Connectors
Well, It was pretty easy to find the first connector (C22D) and the vehicle side loom is populated. This will save a lot of harness modification later. Its the middle grey connector.

The second connector was not so easy to track down. It’s an important one with the power and reverse gear feed. Searching Google for ‘Freelander dimming mirror’ didn’t help much, so I went to the best research tool I know, eBay! I found the image below which showed me the whole roof harness and the other connectors. I’d already found the corrugated tube so could identify where the other tail split off. I should note here that the wiring to the labelled connectors runs down the A-pillar to near the fuse box. The image shows the roof lining stood vertically!
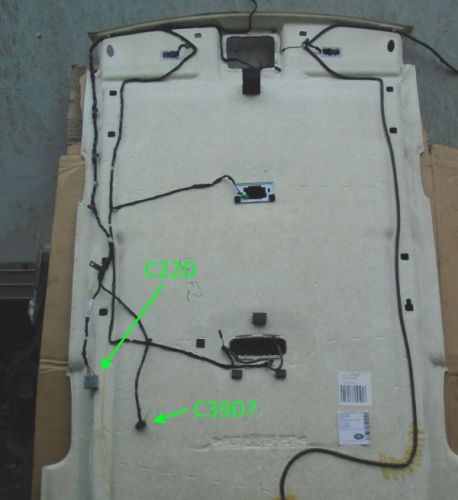
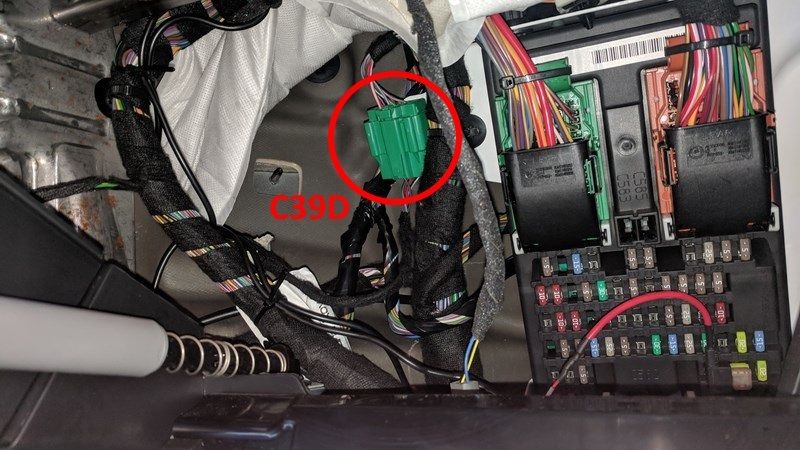
Following this loom from the roof liner and down the A-pillar, I finally found the second connector (C39D). At the time I didn’t have the correct new pins for this connector. Fortunately, it is a common pin so I released one from a spare connector and used it as a pigtail.
Harness to Spec
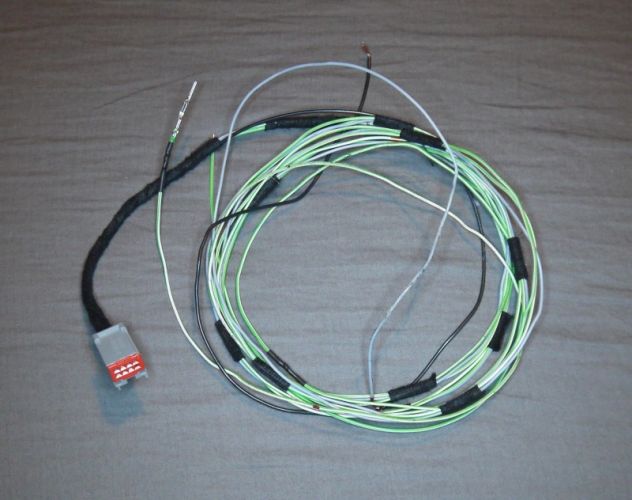
A short time later I had a harness made up with the new Tyco connector and some pins pre-terminated. I’m connecting the ground to the more accessible roof light ground point. I’m not sure if I should have used foam wrap on the harness to stop rattling, but I didn’t have the time or tape. So far it’s not rattled!
First Impressions
I haven’t had time to make the CCF changes for the humidity sensor yet, but the Freelander dimming rearview mirror works without this. From my initial usage, I am rather impressed!
Being an older design the mirror does tend to over dim ( compared to more modern LR products and competitors). Reaction time can sometimes be a little slow to clear, but it’s certainly fast to trigger. I haven’t had a single misaligned headlight bother me on the way to or from work for some time. Even works with high levels of solar on the rear.
CCF Change
Well, only a year and a half later, but I finally changed the CCF with SDD to allow the humidity sensor to function. Pretty simple to do, what I think is the relevant field is shown below.

As the sensors are connected by LIN directly to the HVAC, and it’s warm outside, I don’t know if it’s worked and if this is the right CCF change. Come the winter I’ll be sat out it the car with a coffee under the sensor to see if it make the blindest bit of difference to the HVAC operation!
Final Note
I’ve been told that it’s simply not required for cars with window tints, and why not just add tints. I do prefer the look of a tinted Freelander2, but I also like just how much light gets into the cabin. Something of a catch 22, but ultimately I’d rather have the dimming mirror.
The Freelander dimming rearview mirror has been a godsend for my eyes. And for the sub £50 it cost in total to install, it has been invaluable. I certainly wouldn’t be without it for the 1 hour 6 am commute in the middle of winter!
M
Great tutorial! Actually I would love to do a clean set up one of those android rear view mirrors that feed from the backup camera and give you a live view like on teslas. Some even come with side mirrors!
Hi, do you have part numbers for the Tyco connector and the various pins that are needed?
The TYCO connector at the mirror is a GET series connector, as per the article. The part number is probably 0-1411168-1 for the housing. The matching pin should be 1393367-1 depending on the wire size you use. Honestly, it was a long time ago that I did the retrofit, so I’m taking the part numbers from connectors in my ‘big box of JLR connectors’. The pins for C22D and C39D I’ve never been able to identify. I was fortunate (or wise enough) to take a number of connectors from a scrap car many years ago which have provided the pins I needed.
I hope that helps.
M